Tuesday, June 16, 2009

"Perfectly Chocolate" Chocolate cake for the June babies


Some of my most favourite people are celebrating their birthdays in June. First of all comes my grandma - She is a go getter, loved to travel, daring and very cool kinda person. Next comes my big Sis, my best friend and the other half of this blog. Well the "About Us" section describes us the best. Then comes my dear husband. We both have often thought that we are just so "perfectly" made for each other. Last but not the least my dear dad. Well he is the rock of the family and phew....no one can win an argument with him!!!
This was my first attempt at icing a cake so I was lil sceptical as to how it would turn out, but I wanted to make something special for these special people in my life. So for all you june babies I've baked this "Perfectly Chocolate" Chocolate Cake from Hersheys.

Here's the recipe:
HERSHEY'S "PERFECTLY CHOCOLATE" Chocolate Cake

Ingredients:
2 cups sugar
1-3/4 cups all-purpose flour
3/4 cup HERSHEY'S Cocoa
1-1/2 teaspoons baking powder
1-1/2 teaspoons baking soda
1 teaspoon salt
2 eggs
1 cup milk
1/2 cup vegetable oil
2 teaspoons vanilla extract
1 cup boiling water
"PERFECTLY CHOCOLATE" CHOCOLATE FROSTING(recipe follows)
Directions:
1. Heat oven to 350°F. Grease and flour two 9-inch round baking pans.
2. Stir together sugar, flour, cocoa, baking powder, baking soda and salt in large bowl. Add eggs, milk, oil and vanilla; beat on medium speed of mixer 2 minutes. Stir in boiling water (batter will be thin). Pour batter into prepared pans.
3. Bake 30 to 35 minutes or until wooden pick inserted in center comes out clean. Cool 10 minutes; remove from pans to wire racks. Cool completely.
Frost with "PERFECTLY CHOCOLATE" CHOCOLATE FROSTING.
"PERFECTLY CHOCOLATE" CHOCOLATE FROSTING
1/2 cup (1 stick) butter or margarine
2/3 cup HERSHEY'S Cocoa
3 cups powdered sugar
1/3 cup milk
1 teaspoon vanilla extract
Melt butter. Stir in cocoa. Alternately add powdered sugar and milk, beating to spreading consistency. Add small amount additional milk, if needed. Stir in vanilla. About 2 cups frosting.
---I also added some Nutties on the top for some special effects ;) ;).


So all of you...dig in!!!

Gita

Sunday, June 7, 2009

Indian Folk Art - Warli

Warli art is a simple folk painting of the Warli tribe which depicts everyday village life, social events, marriages and unlike madhubani do not depict images if dieties or any stories from Hindu mythology.

I personally believe the Warli tribe was a set of very happy people as most of the paintings were themed on weddings, celebrations , harvest and simple household activities. There was no war, greed or bloodshed. I guess these are the blessings of a simple life.
Originally they were done on the walls of the houses in the villages of Western India. Nowadays the art form has evolved and it can be seen on cermaic, mud pots, canvas, glass and fabric.

A lot of online information can be found on Warli art, I found this quite a simple and useful site for anybody wanting to get some basic information on Warli art and also helps if you want to do your own first Warli painting.


Well I did mine too, on fabric. A beige silk yoke piece with dancing warli women in black.


and here's a sneak peek into some of the other yokes I'm doing....


So hope you had some warli fun.

cheers,

gita

Thursday, May 7, 2009

With Spring comes....................Spring Cleaning!


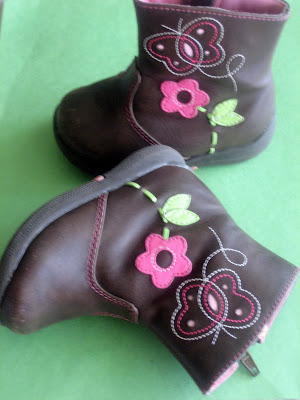
With the weather getting better these days, it was time to get all the winter gear out of the way. As we start clearing out the stuff, we realise that we dont have place to store it all. So our next approach was to go by the "3 aWay" rule - Sort out things to put away, throw away or give away. Everything was going fine till we ended up with some things that wouldn't fit in any category!

Little girl SS 's boots belonged in this category. We got it for her last year and she wore it for her 2nd birthday. She hardly ever wore it because summer came and by fall she had outgrown it. There was no reason to put it away, as nobody could wear it next year. Certainly didnt want to throw it away as it was in good condition and for some reason just didnt want to give it away! The hubby thinks that I am a pack rat, so to keep that reputation from coming up I had to find some use for these cuties.

Who knew the long wait at the paediatrician's office would help me come up with good use for our subject. One of the magazines there featured a flower arrangement in rain boots. Yay! I just got myself a new vase. Yes, the hubby bought me the flowers.......I guess he also had a soft spot for the boots but didn't want to admit it!

Mita.

Wednesday, April 22, 2009

Indian Folk Art - Madhubani


This post is going to be my first in a series pertaining to Indian art and craft. India is a melting pot of different cultures, art, people, religion and cuisine. Even every state in India has a variety of crafts, culture and cuisine. In this series I am sticking to art and craft. Although gaining popularity, not all the art forms are known worldwide. As one of my foreign friends said "India is so fascinating, vibrant and full of colour"
In this post I am showcasing Madhubani art, also called Mithila Art. The literal meaning of Madhubani is "forests of honey". This art form was practised traditionally by women of villages around Madhubani and Mithila in Bihar. It was done on walls and mostly depict nature and Hindu religious motifs and dieties. Now it has evolved and is done on fabric, handmade paper, pots and canvas.

I had attended a course on Madhubani painting in delhi and this is one of my first pieces that I did on fabric during the course. It consists of motifs done on the dupatta and the kurta. Madhubani paintings are filled with fine lines or dashes or coloured. There are paintings which are just "black and white" and the coloured ones too. Even madhubani art has different forms. For more information on Maddhubani art visit http://www.ethnicindiacrafts.com/Indian_paintings/madhubani/

Traditionally natural colours and twigs/bamboo were used for painting, I have used dyes and brushes/liners for the fabric and fade-proof , water-proof black pens for the handmade paper display. For all craft lovers, Madhubani is a very simple art form, easy to do and looks good on fabric as well as handmade paper.
gita

Monday, April 13, 2009

HAPPY EASTER! HAPPY VISHU! HELLO SPRING!


Finally, spring has arrived and so has Easter! With us going veggie for the past 50 days of lent, everyone here has been looking forward to Easter, just as much as spring, so that we could chew on a bone or two. Big girl RM, a carnivore, would argue as to why we had to give up fish and meat during lent. She even went to the extent of suggesting that we should give up vegetables for 50 days! Boy! Woudn't that make her happy! She made it very clear that she would have nothing to do with vegetables on Easter day. So as per tradition we had Appam and "Appa's meat curry" for breakfast, Chicken Biriyani for lunch and cake for desert . "Appa's Meat Curry" is a recipe my dad gave me a long time ago, around the time when I was newly married. It turned out well then and I have been making it ever since. While that recipe will be up in some future post, with spring, Easter and Vishu all here at the same time, its going to be the cake that takes the stage today.


After our heartbreak over the snowshower on the official first day of spring, we were very cautious henceforth in deciding whether it was spring yet or not. However the blooming of the bright yellow Forsythia flowers on the hedge just outside our frontdoor was one sure sign that spring has truly arrived! The flowers also serve as our "Vishu Konna" this year as they have the same colour as the traditional "KonnaPoo" which blooms around the time of Vishu (New Year in Kerala). Our Easter cake was the classic yellow cake with a French Vanilla whipped frosting. With the abundance of fresh flowers and ever so helpful flower-pickers I decorated the cake with fresh forsythia flowers. We went with the whipped frosting over buttercream so that we could eat cake without all that guilt !


YELLOW CAKE:
Pre-heat oven to 350 F. Grease and flour two 9-inch cake pans.
Flour - 2 1/4 cups
Baking powder - 2 1/2 teaspoons
Salt - 1/2 teaspoon
Sift all the above together.

Milk - 3/4 cup
Eggs - 4
Vanilla essence - 1 tablespoon
Whisk all of the above in a bowl and set aside.

Sugar - 1 1/2 cups
Unsalted Butter - 1 cup (2 sticks)
Cream butter and sugar till light.

Add half the flour mixture to the butter-sugar mixture and mix till just incorporated. Now add half the milk mixture and beat well. Repeat with the other half of the flour and milk mixture. Pour the batter into the prepared pans and bake for about 30 minutes.

Cool cakes on a rack. After they are completely cool, trim the tops of the cakes to level them.

COOL WHIP FROSTING
Cool Whip - 1 (8 oz.) tub, thawed
Milk - 1 cup, cold
Jello instant French vanilla pudding mix - 1 box
Whisk pudding mix and cold milk till creamy. Fold in Cool Whip.

Frost the top of one of the cakes. Place the other cake on top of it. Now frost the top and sides of the entire cake. The frosting may also be used to pipe decorations and flowers. I used fresh flowers. If using fresh flowers, make sure they are non-poisonous and no toxic insecticides have been used on them.

In case the ingredients for the frosting is not available in your area you can use this recipe here, which is the real thing.
Dig In!!!!
Mita.

Thursday, April 2, 2009

Fish a la georgia...


I got this recipe from a book on weekend getaways, which I went through while planning for a recent vacation. What caught my attention was the western name of the dish, though most of the ingredients seemed very indian. Anyway I went ahead and made this dish. The recommended fish was pomfret, mackerel, I used seer fish slices though and it did come out well.
So here's a recipe for all fish lovers.

Fish a la georgia
Fish - 1/2 kg
Chilly Powder - 2tsp
Coriander powder, jeera powder, tandoori masala and
Amchur (dry mango powder) - 1 tsp each
Turmeric powder - 1/2 tsp
Ginger Garlic paste - 1 tsp
Coriander leaves - 1/4 cup
mint leaves - 1/8 cup
Vinegar - 2 tblsp
salt to taste.

-- Blend all the ingredient except the fish into a smooth paste.
-- Smear the fish with this and marinate it for at least 4 hours.
-- Shallow fry the marinated fish on both sides till nicely brown.

Enjoy...!!!
gita


Tuesday, March 24, 2009

Welcome Spring!


The past five months have been brutally cold, keeping us holed up indoors. But, tomorrow would change everything. It's the first day of Spring! Here on, we'd be able to step out and smell the fresh air and the pretty flowers and wake up to the cheerful sounds of the birds! At last we could shed the winter coats and the thermals and the hats and the mittens. Ah, life will be sweet! The girls suggested that we make flower-shaped cookies to celebrate. So we spent the evening baking and even decided we wouldn't touch a single cookie till the next day! (Little girl SS was an exception.....she was not going to give up a fresh cookie for all this spring nonsense !) That night we went to bed wishing it would be morning soon! (Not something we'd wish on a normal weekday!).


The next morning I'm woken up by Big Girl RM's loud shriek. I rushed over to the girls' room to check what was wrong, when I saw her standing by the window with a look of disappointment. "Its the first day of spring and its snowing, mommy! I think Mother Nature's gone cuckoo! " I looked out to see that everything was covered with a good dose of powdering and we were in for more. What happened to the sun and the birds and the flowers and all? The great expectations we had for this day! And now I'm left with the task of convincing a little girl who had decided she was going to wear a sweater and tights to school today to put put her winter garb back on.


A sudden flash of enlightenment! A few of those delicious flower cookies with her morning cup of milk should do the trick. It did! I guess RM's happy now that Mother Nature went cuckoo, she got her early morning overdose of sugar!

1 cup butter
1 cup sugar
2 eggs
2 tsp. vanilla extract
3 1/2 cups flour
2 tsp. baking powder
1/2 tsp. salt
Strawberry jam

Sift all the dry ingredients together.

Cream the butter and sugar together till light.

Add the eggs and the vanilla extract and mix till combined.

Slowly add the dry ingredients and knead into a soft dough. Cover in plastic wrap and refrigerate for an hour or two.

Pre-heat the oven to 35o F.

Roll out the chilled dough to 1/4" thickness. Cut out cookies using cookie cutters. I used Linzer cookie cutters. If you dont have Linzer cookie cutters, use any flower-shaped cookie cutter. Use a small round cutter to take out centers of the flowers of half the total number of flowers. These are the top cookies.

Bake for 10 minutes. The cookies should just begin to turn brown around the edges.

Cool the cookies completely.


To assemble:
Take a whole flower cookie. Spoon some jam in the center. Make sure not to put too much as it may overflow. Now place a flower cookie with the center cut out (top cookies) on top of the jam and slightly push it in so that some of the jam comes through the center hole.


Make any day a Spring day!

Mita.