Thursday, July 1, 2010

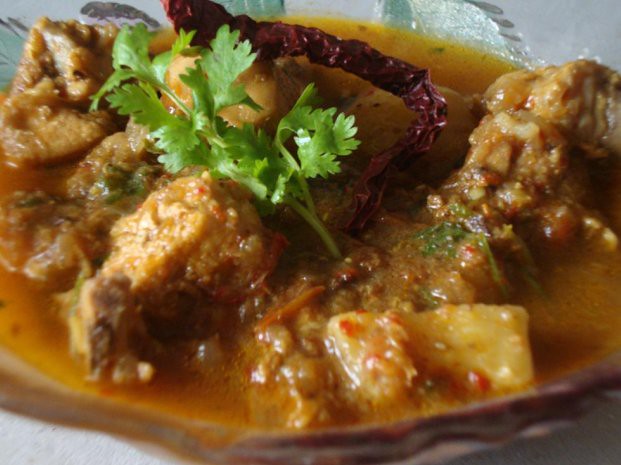
Karaikudi Chicken Curry


First of all...sorry for the looooong wait for the next post. Just saw that its been over a month since we posted. Since sis is on holiday I guess the onus in one me to keep the blog rolling. So here's a quickie post..... "Karaikudi Chicken Curry" recipe that I borrowed from my SIL's cookbook. It goes well with rotis and white rice.


KaraiKudi Chicken Curry

1. Chicken - 500g
2. Onions - 1 diced
3. Tomato - 1 diced
4. Turmeric Powder - 1/2 tsp
5. Chilly Powder - 1/2 tsp
6. Coriander Powder - 11/2tsp
7. Mustard - 1/2 tsp
8. Cumin Seeds - 1/2 tsp
9. Fenugreek - 1/2 tsp
10. Oil, salt as required.
11. Coriander Leaves - handful

To Roast and Grind:

dry red chillies - 5
coriander seeds - 2 tsp
ginger - 1"
garlic - 7 small
cinnamon - 2"
cardamom - 2
pepper - 1 tsp
clove - 5
grated coconut - 4 tsp
curry leaves - few

-- Marinate chicken in turmeric and salt.
-- Heat little oil and fry ingredients for roasting and grinding.
-- Add a little water and blend to a smooth paste.
-- Heat oil add mustard, cumin seeds, fenugreek and onions.
-- When the onions brown, add tomatoes and cook till soft.
-- Add chilly powder and coriander powder and saute for 5 min.
-- Add the ground paste and saute for 3 min.
-- Add chicken and little water and adjust salt. Cook for 20 min or till done.
-- Garnish with coriander leaves.

gita

Thursday, May 27, 2010

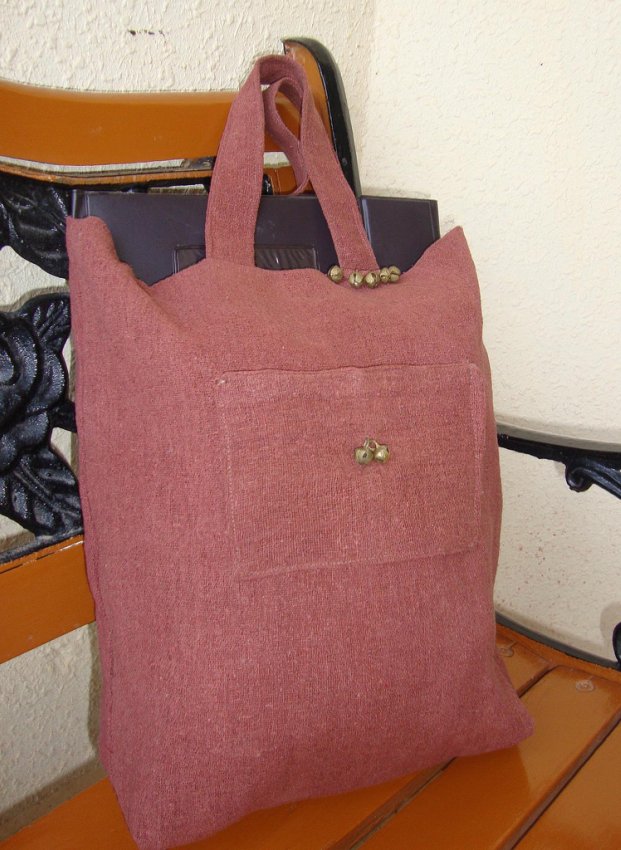
Recycling - From a kurta to a kool Tote


Recently I was cleaning up my wardrobe and separating the clothes I hadn't worn in the last two years so that I keep only the clothes I wear and get rid of all the clutter. Among the clutter was this chocolate brown jute salwar set with cute little bell embellishments. I didn't want to throw this away so I decided to recycle this and breathe some new life into it. Well it would serve another purpose too : Last year I had bought myself a sewing machine and I decided to get into sewing. With so many blogs and really good tutorials available on the net, it has become very easy to learn anything....and you get a lot of ideas too. So here lay the fabric for my next sewing project.
I had actually done some research and finally zeroed in on Tote Tutorial for beginners by Rita. She has given very clear instructions and also pictures of each step. Great one for beginners (like me). I was waiting for the weekend to buy the fabric but didn't have to now.
For the tote I followed Rita's instructions exactly and for the recycling part.....I used the body of the kurta, that is the widest part from the bottom, for the body of the Tote. I didn't bother with removing the stitches I just snipped away to get my two rectangles. From the top part of the kurta, I got my handles for the Tote. That leaves us with just the two sleeves and the bell embellishments. One of the sleeves was used for the inner pocket and the other sleeve for the pocket which is seen on the outside. I decided to use the bells too to decorate the Tote. I snipped off the string of bells, took 2 bells out and sewed them on to the outer pocket and sewed up the remaining bells as is on to one of the handles. There you go from a "kurta to a kool Tote"....And I am glad.
gita


Friday, April 30, 2010

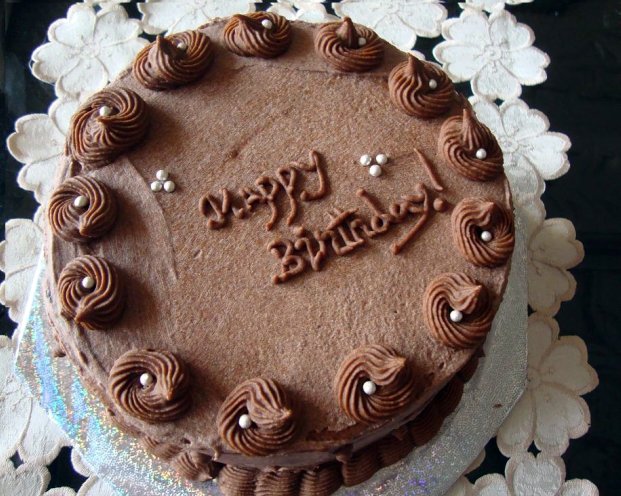
Happy 80th Birthday !!!


"Grandmas are for stories about things of long ago.
Grandmas are for caring about all this things you know.
Grandmas are for rocking you and singing you to sleep.
Grandmas are for giving you nice memories to keep.
Grandmas are for knowing all the things you're dreaming of...
But, the most important thing of all,
Grandmas are for love."

This post, a week late is for a very special person who just turned 80. She is my Grandmother and also my Godmother. She is one of the most selfless human beings I've ever seen. An excellent cook ( she started at the age of 12) and always a delight to be with. She is a homebody and hates to go out. She just loves to stay at home and cook and serve for the family.

My grandmother is the ultimate chocoholic. Yeah she can survive on just chocolates and that is something she would never say not to, no matter what. And I know from whom I inherited this gene from ;);) !!!

So on her special day I made this "Black Magic Cake" from Hersheys. Its really dark colored cake. But be sure you use the freshest of baking powder and baking soda. Its kinda very similar to the Hersheys Perfectly Perfect chocolate cake I had posted earlier. I used Hersheys Perfectly Perfect chocolate frosting to cover the cake.

gita

Wednesday, April 21, 2010

Sewing Challenge for the "Sewing Challenged" !

Its almost getting to the middle of the year and I thought it's high time to honor one of my new year resolutions for this year - to get serious about sewing! Yeah, sure I can do some hemming, some mending, make some simple skirts or anything involving straight stitching and cutting. But when it comes to tops and pants and things like that, I'm terrified. I feel like once you've cut the armsyce or the seat, there's no going back if you've done it wrong. With other crafts like crochet or knitting or even hand embroidery, if you don't like it, just rip and redo!


So, I, a "Sewing-challenged" person decided to take the plunge and get rid of my self-given title! With summer around the corner, I was going to make a skirt and top for Little Girl SS. (Summer clothes are definitely easier to make and an outfit for Little Girl meant that lesser fabric would be wasted in case of a blunder! Oooo! The ghost still hangs around! The title's going to be a keeper, you think?!) The challenge was on! The skirt was a breeze. Took the easy route - all straight stitching and an elastic waistband. A moment of prayer and the fabric for the top was cut. Sewing went much better than expected and Ta Da!


The outfit was finished while Little Girl SS was taking a nap. So, as soon as she woke up I scooted upstairs with it so that she could try it on. What I got is one look up and down and "The top's not fancy, I dont want it. I'll keep the skirt."! I was speechless! Not fancy?!!! Okay Little Girl, I can do fancy! The challenge had only begun! I spent the better part of the evening ripping the seams open, something I hate to do. (All that piping! sigh!) There was no more fabric left, so I had to make do with whatever I had already cut. That didn't leave many options for "fancy"! A fresh start on the next day and this is what I came up with using only the two front panels of the first outfit!


It must have turned out fancy, because she was quite excited to try it on this time around! She's only three. Imagine what it's going to be like when she's 15!!!!

Mita.

Thursday, April 8, 2010

Easter Basket Goodies

The festival of Easter comes with a number of symbols and traditions. Apart from the religious importance of the day there are the Easter Baskets laden with Easter Eggs, Bunnies, Hot Cross Buns, Easter Lillies, Cookies, Chocolates to make it more fun. This Easter my Easter basket had Chocolate Easter Eggs, a cute little Amigurumi Easter Bunny, and yummy Traditional Easter Biscuits.

Chocolate Easter Eggs:


My Chocolate Easter Eggs were store bought and were given by my SIL. Though I found some interesting Chocolate Eggs at Martha Stewarts Easter Crafts.

Easter Bunny:


Amigurumi is the japanese art of crocheting or knitting, stuffing and sewing small animals or toys. So I tried to teach myself crochet and Amigurumi with the free pattern of this cute little Easter Bunny from Lion Brand. You have to register with Lion Brand to see the patterns. It's free :) !!

Traditional Easter Biscuits

This recipe is from my grandmother's recipe collection. They are cookies with little currants and have a nice buttery taste. This recipe also uses lemon zest which adds a very subtle lemony flavor.

Recipe
1. Plain Flour - 2 cups
2. Pinch of salt
3. Butter - 1/2 cup
4. caster sugar - 1/2 cup
5. Grated Rind of 1/2 lemon
6. Baking Powder - 1/2 tsp
7. dried Currants - 1/2 cup
8. Egg - 1

- Sift flour, salt and baking powder.
- Rub in the butter to form a crumbly mixture.
-Add in the sugar, grated lemonrind and currants.
- Beat the egg lightly then work it into the mixture until it forms a stiff dough.
- Roll out the dough to 1/4 inch thickness and cut using cookie cutters.
- Bake them for 10-12 minutes at 350F till they are lightly golden brown.
- Cool them and store in airtight containers or watch them disappear.

Note:
To get a nice glaze
After five minutes of baking, take the cookies out of the oven, brush with beaten egg white. Sprinkle with little caster sugar and pop them back into the oven to continue the baking.

Happy Easter !!!
gita


Thursday, April 1, 2010

Spring Break.......At Last!!!


Aah! Finally we can put our feet up for a while and relax! Spring break is here! The past few weeks have been kind of a whirlwind. We packed in numerous tests at school, parent-teacher conferences, ear infections, 500-word essays and what nought into those days! The hub has been super busy with work. And the weather........ has been brutal! Pouring rain, non-stop! We had to boil the water before use. Just getting out of the house was a mess! Winds.....our dish got blown down. We were without television for a few days. Aaaagh!!!! Anyway, this morning the weatherman has assured us that we can expect almost summer-like weather for the next few days upto Easter! Yay!


Okay, we're not yet into barefeet or flip-flop kind of weather, but we can still have pretty slippers, right? I used this pattern for Little Girl, SSs' slipper. I avoided the button for the straps and just attached the strap to the other side for ease of use. I used the same pattern for Big Girl RM's slipper but skipped the strap and added a flower. This is how I made the flower:

1) Chain 2.
2) 10 sc in second chain from hook, join with sl st to 1st sc. Chain 1, turn.
3) 1 sc, 1dc, 1trc, 1dc, 1sc in 1st sc , skip next sc. Repeat all around.


Well, I'd be kidding myself if I thought these feet were going to stay up for long! You guys have no idea what I went through to just take a few still pictures!!

Happy Spring!

Mita.

Tuesday, March 23, 2010

Laal Maas (Red meat curry) and Tikona Rotis

Lal maas is a popular dish from Rajasthan. The recipe for this has been lying with me now for a couple of years. I had kept it safely with me wanting to try it out. But soon forgot about it till the same recipe appeared in the newspaper a few days back. So I had to try it out this time. And it did taste as good as it looked. Though not as spicy and fiery as it looks. The nice red color is got because of the kashmiri red chillies used. I served this with tikona rotis. My husband came home for dinner and he thought I had ordered in. I have read somewhere that you can try the same recipe with pork too. Well if any of you try it with pork lemme know.
So here are the recipes (my slightly tweaked version) for lal maas and tikona roti.

Lal Maas


1. Mutton - 1/2 kg
2. Oil - 1/2 cup
3. Onions - 2 chopped fine
4. Ginger Garlic paste - 2 tblsp
5. whole spices - ( black & green cardamom - 2 each, cinnamon - 2 ", Bay leaves - 2,
whole black pepper - 1 tsp )
6. salt to taste
7. Whole Red kashmiri chillies - 6 - 8 ( I used 7 )
8. Coriander Powder - 1 tblsp
9. Turmeric Powder - 1/4 tsp
10. Curd - 3 tblsp
11. Tomato Puree - 100 g
12. Garam masala - 1tblsp
-- Soak red chillies in 1/2 cup water.
-- Heat oil. Add the whole spices. When it crackles add onions and saute till it turns golden brown.
-- Add ginger garlic paste and the cubed mutton and cook till oil comes out.
-- Grind the red chillies to a fine paste and add to meat.
-- Add all spices except garam masala and saute.
-- Add beaten curd and cook till the meat is half cooked. (Original recipes calls for slow cooking. I used the pressure cooker till 1 whistle.)
-- Add tomato puree and cook till done .
-- Finish with garam masala.
-- Garnish with freshly chopped coriander leaves.
Tikona Rotis


This is the healthier version of the Tikona Parathas adapted from Jeeti Gandhi's book "Curry Leaves and Cumin Seeds".
-- Take your dough for the roti and divide into balls.
-- Take one and roll it into a circular shape as you roll for a normal roti.
-- Using a pastry brush apply a little oil or butter and sprinkle with little flour. Fold in Half so now you have a semi circle shape.
-- Repeat the above step and now you have tringular shape with a rounded base.
-- Roll this into a this larger triangle. Repeat the same with the remaining balls. Cook on a griddle till done on both sides.
This is specially for my niece RM and BIL who are very fond of north indian cuisine and also to tempt them to come to India soon.

love,
Gita